How to set up a Lenovo ThinkPad USB-C with USB-A Dock (Model: 40AF0135US)
Click here for a video version of this user guide.
Diagram A
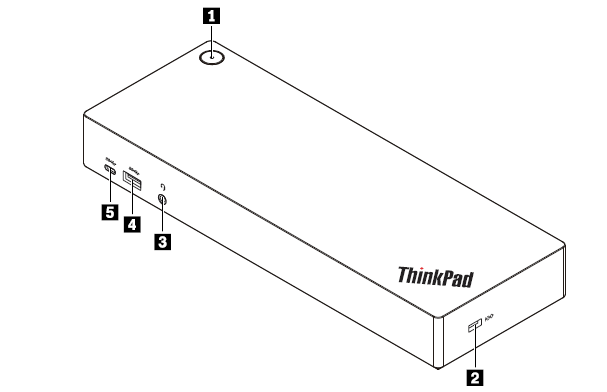
Diagram B
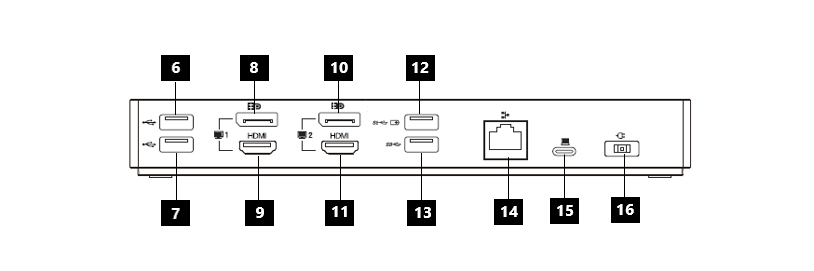
(1) Power button with indicator: The power button indicator shows if the dock is powered on or off.
- Amber (when computer is not connected to the dock) – the dock is on.
- Solid white (when computer is attached to the dock) – the computer is on.
- White blinking (when computer is attached to the dock) – the computer is in sleep mode.
- Off – the computer and/or dock is off
(2) Security-lock slot: To protect your dock from theft, you can lock your dock to a desk, table or other fixture through a security cable lock designed to fit the security-lock slot on your dock.
(3) Audio connector – Connect headphones or a headset with a 3.5-mm plug.
(4) (13) USB 3.1 Connectors Gen 2: used to connect USB-compatible devices, such as a USB keyboard, USB mouse, USB storage device or USB printer.
(5) USB-C connector (for USB-C compatible devices): Use the connector to transfer data or charge your device. This connector can supply power up to 5V 3A during the charging process.
(6) (7) USB 2.0 connectors: Connect USB-compatible devices such as a USB keyboard, USB mouse, USB storage device or USB printer.
- It is recommended that you connect the keyboard or mouse to the USB 2.0 connector on the dock.
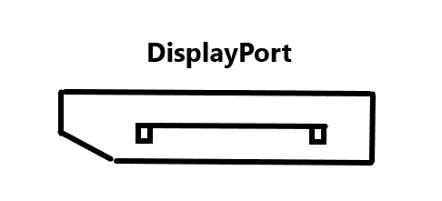
(8) (10) DisplayPort connectors: Connect a high-performance monitor, a direct-drive monitor, or other devices that use a DisplayPort connector.
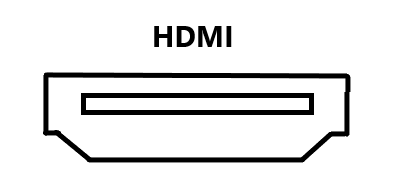
(9) (11) HDMI connectors: The High-Definition Multimedia Interface (HDMI) connector is a digital audio and video interface. It enables you to connect the dock to a compatible digital audio or video monitor, such as an HDTV.
(12) Always On USB 3.1 connector Gen 3: Used to connect USB-compatible devices and charge some mobile devices and smartphones when the dock is connected to the power supply. This connector can supply power up to 2.4 A during the charging process.
(14) Ethernet connector: Connect an Ethernet cable to an Ethernet local area network (LAN).
(15) USB-C connector (for connecting computer): Connect the USB-C cable to the computer.
(16) Power connector: Connect the ac power adapter.
Connecting the dock to your computer
The following items should be included in the package that your dock came in:
- ThinkPad Hybrid USB-C with USB-A Dock
- ThinkPad USB-C Cable with USB-A Converter (referred to as UBS-C cable)
- AC power adapter and power cord
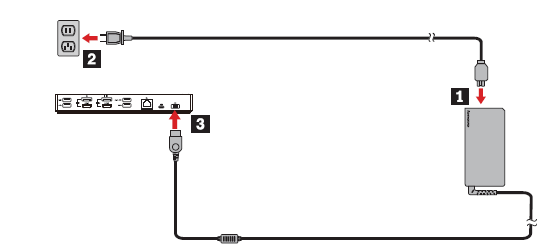
To connect your dock to your computer, you must:
- Connect the power cord to the AC power adapter.
- Connect the power cord to an electrical outlet.
- Connect the AC power adapter to the power connector on the dock (See #16 in Diagram B)
4. Connect one end of the USB-C cable to the USB-C connector (See #15 in Diagram B)
5. Connect the other end of the USB-C cable to the computer by doing one of the following:
a) Connect the USB-C cable to the USB-C connector on the computer (see 5a below). The dock supplies power to the computer through this method.
b) Connect the USB-C connector to the USB converter. Then connect the USB converter to the USB 3.1 connector on the computer (see 5b below). The dock does not supply power to the computer through this method.
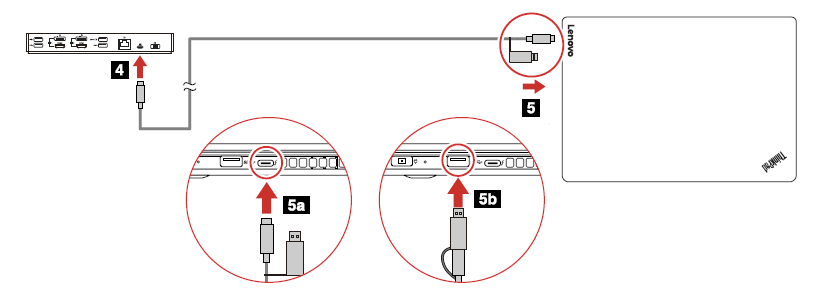
6. Ensure the dock is powered on.
Connecting your external monitors to the dock
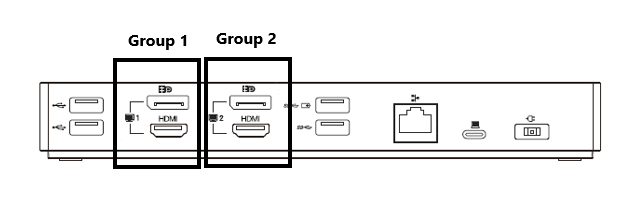
The dock has four video output connectors (as shown below) to support up to two external monitors.
To connect an external monitor to your dock, you must:
- Connect the video cable to the appropriate connector on the dock.
- Connect the other end of the video cable to the appropriate connector on the external monitor.
- Ensure the monitor power cord is plugged into an electrical outlet and the monitor is powered on.
Note: There are two different connector options (DisplayPort or HDMI) for each external monitor. Each group can only support one monitor connection at a time.
Group 1: Use either the DisplayPort or HDMI connector (depending on the cable you have).
Group 2: Use either the DisplayPort or HDMI connector (depending on the cable you have).